All posts by wildthi1

It’s about time!

I can’t believe it’s been over a year since I last posted, but I can explain.  It’s a very phenomenal explanation, but hear me out.

The last post I did was the trip to the Tennessee Coneflower patch near Nashville and remember I mentioned taking a visitor from India with us on the trip?  Well, he was scheduled to stay in America for one month but decided to stay.  He’s a meditation teacher, and he had begun teaching people in the area about meditation.  Before finding a place to settle down, he was rotating every few days, staying with several people, including here at the farm.IMG_3488

I really enjoyed his talks and was fascinated with the idea of  meditation, and I could see that he was growing tired of packing up and changing locations every few days.  The upstairs in my house was just a cluttered mess of craft projects (I had cleaned out one corner for him to sleep in when he was here every week or so), so I asked him if he would like to just stay here until he got settled in America.  He said “yes, that would be nice”.   So we cleaned out the upstairs (that was truly embarrassing) and he moved in.  So much for a quiet retirement….lol!

He founded a non-profit organization in India called “Ahamo”.  “Aham” means “self” and the word “Ahamo” means “celebration of the self”.   He also set up the organization in America as well–he could clearly see that we are stressed and spiritually deprived–sad, but so true.

I had stopped doing the CSA and cut way back on market farming.  That’s a good thing because now I’m knee-deep into helping transcribe talks into books, recording videos, writing blogs for the Ahamo web page, and on and on…..

After much discussion, we decided to grow Ahamo US right here in Crab Orchard.  Yes!  A meditation retreat in Crab Orchard.  I think it’s a wonderful idea.  The farm is way too spectacular to just sit idle and people just love coming to visit, so why not?  We just completed the first student accommodations:

IMG_0807.jpg

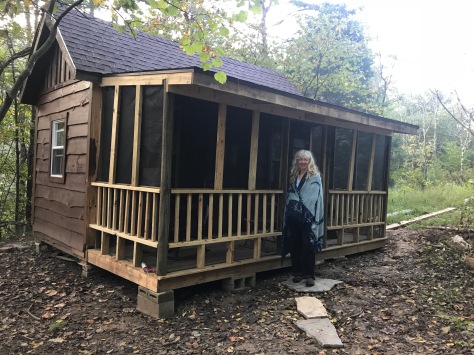
Still have to do rock around the bottom and a little landscaping, but we have a student staying here already!

Next up is a place to hold programs.  We eventually would like to build a large meeting facility, but just getting started, funds are a little slim… so we’re going to build the Welcome Center/Gift Shop/Office first and use it as a meeting place until we grow enough to be able to build the larger one.  It’s going to be awesome!

So, the Farm Life Adventures of the Happy Hoer continue.  I still have bees and gardens, herbs and dogs, building projects, adventures of all sorts, and lots of interesting and inspiring things to share.  Only now, I can add more adventures to the repertoire–spiritual things and yoga stuff and mystical musings.  Stay tuned…..


Tennessee Coneflower is off the list!

There is a beautiful plant that is only found in Tennessee.  Davidson County, Tennessee, to be exact.  It’s the Tennessee Coneflower (Echinacea tennesseensis) and it grows in the cedar glades of middle Tennessee.  It had been on the Endangered Species List for several years and through the efforts of several local botanists and garden enthusiasts, it was removed from that list in 2011.

The list I’m speaking of in this post is actually my bucket list.  See, I’ve grown Tennessee Coneflowers several times in my gardens but never actually got to go visit them where they live.  This year I did.  I’m on a bucket list roll…..

IMG_3485.JPG

The cedar glades is characterized by a really rocky shallow soil with cedar trees as the main tree and several species of plants that prefer sunny, exposed, dry conditions.  We also saw these cool seedpods from Missouri Evening Primrose:

IMG_3484.JPG

Another thing that made the trip fun was taking along a new friend from India who is fascinated with America and he wanted to come along

IMG_3488

It’s interesting to compare cultural differences between the countries and talk about life in each place.

So, on to the next bucket list item……

IMG_3489

Durango/Silverton Narrow Gauge Train Ride

This and the next several posts will more than likely be about interesting things I did on my recent trip to Colorado–farther away from home than I’ve ever been by myself, and the longest I’ve ever been away from home. period.

The “Good Medicine Confluence” was held in Durango, Colorado this year.  I subscribe to their website and about last December I got a notice that the 2017 conference was going to be held in Durango, Colorado, and as I hit “delete”, I thought “that’s nice”.  Well, I found Karma (my teardrop camper) in late January and when the next notice came out, Karma hollered at me and said “let’s go!”  So we did.  When I told anyone where I was going, they all said “do the railroad”… so I did.

IMG_3205fullsizeoutput_4f7It was amazing.  It’s a trip on the train that takes all day and it’s really a lot of fun.  I rode in a gondola type car which was great!

IMG_3202I was chatting with folks on either side of me.  On my right was a couple from Texas and on the left was a couple from  a town about 30 miles from me–lol!  Anyway, the scenery is awesome, the train attendants are fun and……

The only thing is the smoke from the engine….. gets in your hair…..

IMG_3266

The conductor or engineer, whatever, came on the loudspeakers and said that the train would use 6,000 pounds of coal and 12,000 gallons of water on the trip.  We stopped to pump water out of the river and water tanks 4 different times.  That sort of made me cringe (the coal thing, anyway).  Then when I washed out my hair at camp,  Yuk!  Lungs too…..oh well.  It was a fun experience. period.

Karma

All during my childhood and early teen years my family went camping.  Always looking for fun things to do on the cheap, picnics, swimming in creeks and rivers, and camping were at the top of our list of fun things to do.  When I was married we went camping quite a bit too, but then we moved into a camper while building a house–twice–so that sort of ended our camping forays–lol!

Since I’ve slowed down on the veggie gardening to save my back, I “got the hankering” to do some camping again.  I have a tent but really like the teardrop campers I’ve been seeing.  I found one not too far away at a decent price, so I brought it home.  It’s a Little Guy Five Wide.  It’s pretty much a queen size bed on wheels, with lots of storage space…..

IMG_2749Well, I wasn’t crazy about the decals on it so I took my thumbnail and began scratching….. they came off pretty easily!

IMG_2805

Then I had a naked camper and no idea what I was gonna put on it!!  So, I started searching online for decals.  I found a site called HippyMotorsUSA.com which is here in Tennessee, searched and searched on their website and found an amazing array of gorgeous stickers.  I ordered almost $200 worth of stickers from them and a gigantic peace sign from another company and went to work.  I made a template of paper of each side of the camper and laid the stickers out on the paper before putting them on the camper.

IMG_2838

After mustering up the courage to apply all the decals to the camper, the project went smoothly.  These are applied while wet so you can slide them around until you get them where you want, get the air bubbles out and when they dry, voila!  They are stuck.  Here’s the result:

I belong to a social media group of teardrop campers and one of the members asked if anyone else named their camper.  I hadn’t named the camper as of that time, but there was a sticker on the website which said “Keep Karma”.  I thought that sounded stupid,  but the font was pretty and the “Karma” tugged at me, so her name is “Karma” cause she follows me around 🙂  I’ll be posting about our adventures … stay tuned!

Foxfire, flea-markets, and yard sales

Back in October I ventured off the farm again, but this time I had a friend with me.  We went to Black Rock Mountain Campground in Mountain City, Georgia.  The weather was a little unseasonably cool, like a really cold snap in the middle of an otherwise awesomely warm and sunny Autumn in the southeast.

Tent camping……35 degrees……we did great!  We toured Tallulah Falls, which was awesome!  There are several hikes around the gorge with some of them going down into the gorge by way of steps.  The map even has the number of steps indicated–347 steps one way–we opted for the less aerobic version of the tour around the top of the rim and we saw all we needed to see, thank you very much!  Our aerobic exercise was saved for the rigors of camping and flea marketing–i.e. scrounging firewood, walking great distances to restroom/showers and in search of the best deal of the day.


What would normally be a 2-1/2 to 3 hour drive to north Georgia took us 8 hours–yes 8 hours to accomplish!  We stopped at lots of yard sales and we both came home with a car load of goodies.  The Subaru veggie wagon was already busting at the seams with camping gear, but when we started hitting good yard sales we got very creative with our packing.  Here are a few photos of some of the goodies I came across–


At one yard sale (where all the socks were) the lady told us a very interesting story about when she was an infant in East Germany.  She had a tumor behind her ear when she was 9 months old and her mother took her to the hospital to have it treated/removed.  After the surgery the wound was draining and her mother could see that she wasn’t getting proper care so she hid her baby underneath her cloak and smuggled her out of the hospital.  She said that if her mother had gotten caught that they both would have been killed immediately.

The next day that hospital was bombed and everyone in there perished.  Her mother is now 99 years old and lives with her.  She no longer knows who she is or where she is, but she is being cared for by a loved one.  That was a very intense, touching story that we wouldn’t have experienced if we weren’t taking our time and enjoying the ride.

The trip home was uneventful (yay for that!), on Sunday, and we opted for the scenic route home through the mountains.  Gorgeous scenery, close friend, no car trouble–what more could one ask for?  It’s always good to get back home though.

blue5.2014

I’ll report on our trip to Foxfire Village in a future post.


Installing a Trailer Hitch on the Forester (and I love Subarus)

Over the years I’ve owned 5 Subarus.  Some people call us a “cult following”.  Those of use that drive Subarus, well, we just like our Subarus.  The third Subaru I owned was given to me by my next door neighbor.  They owned 45 acres adjacent to our 90 acre property and they used the car to haul firewood and rocks up and down the steep gravel/dirt road to the river.  Someone broke the windshield in it so he said “take it if you want it”.  I drove it back and forth to work for 1-1/2 years, with grass growing in the back of it–lol!  I sold it for $500 when I got through with it.

I recently bought a tear drop camper (another post) and had a 1997 Subaru Outback that has a hitch on it.  Next thing I know I’m planning a trip out west so I was thinking I needed a newer car.  After searching for several weeks I found a 2010 Subaru Forester (red, cause I refuse to drive a silver/gray car).  I love it, but it didn’t have a hitch.

The dealership where I bought my camper put the wiring in for the proper plug for my camper and charged me $250.  I thought that was highway robbery, but paid it.  So, when I needed a hitch AND wiring on my new car I made up my mind I was gonna do it myself.  Enter YouTube videos–I love YouTube videos.  They can get you in trouble, but have helped me in soooo many situations.

I ordered the hitch from eTrailer.com, along with an adapter to go from 4 prong to 7 prong and a wire all the way to the battery for charging the battery on the camper while it’s connected to the car; pretty neat!

The youTube video for installing the trailer hitch on a 2010 Subaru Forester is fantastic!  The hitch is pretty heavy and I recommend getting help if you can, but if you’re like me, the dogs aren’t much help.  Here’s the procedure in pictures:

IMG_2816

This is the hitch.  All hardware was included.  I made about forty eleven trips to the shop for tools, but that’s normal when I get into a project.

First thing was to lower the exhaust system so I could get to the holes in the bottom of the car where the hitch was to be mounted.  Those rubber isolator things were hard to get off–I sprayed them all with Blaster and let it sit for a few minutes.  That helped, but they were still not easy to remove.

IMG_2819

I ran a strap underneath the exhaust system to keep it from dropping to the ground when all the isolators were taken loose.

First thing was to locate the holes for the mounting bolts and enlarge one of them to get the block and bolt through the hole.  The other hole had to be enlarged just a smidge so the bolt would pass through there as well.  It would be so easy for Subaru to just do this at the factory………

IMG_2822

Both holes had rubber plugs in them–here I’ve removed the left one.  This is the hole you have to enlarge quite a bit to get the block and bolt through…..

IMG_2823

I drilled a 3/8″ hole right beside it then knocked out the little bit between them.  Everything went in okay.  They send these cute wires that are twisted up to be able to screw the bolts onto so you can pass them into one hole and back out the other.  Pretty clever, I think.

IMG_2825Here is the bolt threaded onto the wire just before I stuffed them into the hole and pulled them out the other side. (below)

IMG_2827

After both the bolts and blocks are in position, LEAVE THE WIRE THINGEES IN PLACE!!  You’ll need to hang onto them while you position the hitch over the bolts.  The hardest part of the entire operation was balancing the hitch on my knees.  I lifted it as far as I could and secured it with a red ratcheting strap then pushed it on up with my knees.

IMG_2830

While I attempted to put washers and nuts on the bolts protruding out of the holes.  I dropped the washers repeatedly and couldn’t get either one of the dogs to fetch them for me.  FINALLY I was able to hang on to them long enough to get them on the bolts.  The wiring wasn’t difficult and I mounted the plug receptacle right next to the hitch, using a cable tie to secure it to the hitch frame.

By doing this myself I spent $197 on the hitch and wiring and no labor cost.  I, indeed, was ripped off by the dealership.  Live and learn.


Speedy Miso Spinach Mushroom Ramen

So, anybody else get in eating ruts?  I’m sure you do, and every couple of months I get bored with the meals I’m preparing, especially in the winter when there’s not much fresh coming in and I just sort of panic every time I go to the grocery store because I don’t know where the food came from, how it was handled and treated, yadda, yadda, yadda.

I subscribe to a blog called “Vanilla and Bean” and she has some interesting recipes on there occasionally.  Recently there was a post for this noodle dish that looked interesting for a bowl full of comfort food during this last leg of winter.  The high tunnel is about finished but there is a little spinach hanging on and I was able to glean a bag of that, and a couple of days ago a walk through the mushroom corner yielded about 8 nike shiitake mushrooms, so that’s why the recipe caught my eye.

Ever buy stuff at the store thinking “hmmm that looks interesting”, get it home and can’t figure out what to do with it?  Well, miso was hanging out in my fridge just screaming “use me, use me” every time I opened the door.

This was it…..I used it!!

And it was good.

Here’s the recipe…… from Vanilla and Bean

Speedy Miso Spinach Mushroom Ramen

A fast and hearty weeknight dinner. Speedy Miso Spinach Mushroom Ramen is packed with ginger, garlic, shiitake mushrooms and oodles of soba noodles! Vegan + Optionally GF

 Total Time 30 minutes
 Servings 6 Servings
 Author Traci York | Vanilla And Bean

Ingredients

  • 2 Tbs Coconut Oil unrefined, virgin, cold pressed
  • 12 oz (340g) Shiitake Mushrooms stems removed, sliced thin
  • 1 Tbs Grated Ginger I use a microplane
  • 1 Tbs Grated Garlic I use a microplane
  • 4 Green Onions sliced thin, whites and green seperated
  • 4 C (940g) Vegetable Broth
  • 3 C (675g) Water
  • 2 Tbs White Miso
  • 2 Bundles (152g) Soba Noodles
  • 5 C (95g) Baby Spinach
  • Tamari, to taste

Serve With:

  • Sesame seeds, Sriracha, fresh herbs such as basil or cilantro, tamari and more green onion tops

Instructions

  1. In a Dutch oven (non stick is very helpful here), heat oil until shimmering. Turn the heat down to medium low to low and add the mushrooms, ginger, garlic, and white parts of the onions. While the pot will be crowded, allow the bottom layer of mushrooms to cook for a few minutes before stirring. This will help the mushrooms sear a bit. Stir occassionally for about 6 minutes. You’ll notice the garlic and ginger stick to the bottom of the pot (but watch the heat because you don’t want the garlic and ginger to burn). Just scrape the garlic and ginger when you stir the mushrooms. When the bimg_2793roth is added, the pan will deglaze and those bits will add delicious flavor! Add the broth, water and miso and bring to a boil, mashing the miso to break it up. Once boiling add the noodles, turn down to medium and simmer for five minutes or until the noodles are tender. Taste for seasoning adjustment and add Tamari if a more salty taste is desired.

  2. Ladle into soup bowls, top with a handful of spinach and sprinkle with sesame seeds. Serve immediately with extra spinach, sesame seeds, sriracha, herbs, tamari and onion greens.

  3. Store leftovers in a lidded container, in the refrigerator, for up to three days.

    Of course I never have all the ingredients, so instead of green onions I used regular onions and I buy organic ginger when I’m at Earth Fare in Knoxville and freeze it in 1″ sections.  That way I can take it out of the freezer and use it in recipes as needed.  I also used chicken stock because I have homemade chicken stock in the freezer.  I put a generous handful of spinach leaves in the bowl and poured the noodle mixture over it.

    img_2794I’m glad there’s leftovers…….

Sugar free, all natural “ice cream” (no churn, either!)

IMG_1589.JPG

I can’t believe that this awesome way of making ice cream is just now making it my way.   Once I tried it and was totally blown away, the two friends that I shared it with had already done it!!!  What?  How?

Last summer I procured an ice cream maker from a friend–well actually, we were in a thrift store and I bought a paper cutter for $1 and she bought an ice cream maker for $2 and we traded!  I was looking up recipes online for sugar free ice cream and wasn’t having much success, until I ran across the old frozen banana ice cream trick!  Have no idea which site it was on, but I definitely don’t take credit for the idea.

All you do is get a ripe banana or three, peel and slice into 1″ slices.  Freeze them for at least 2 hours.  Put them in a food processor; I’ve got one of those small one cup processors and it wouldn’t handle the job, so I had to empty the banana chunks into my regular size food processor.

Pulse the chunks until they are a little smaller, stop the machine and scrape the sides.  Pulse again until they are even smaller, stop and scrape, and do this several times and keep on processing until all of a sudden the consistency becomes like, well, just like ice cream!  The flavor is not surprisingly not intensely banana and could be flavored chocolate really easily, and as a matter of fact, there is a bunch of ripe bananas on the counter right now that will become chocolate ice cream tomorrow….yum!

By the way, it doesn’t quite taste the same if you freeze it after making it, although I’d say letting it sit out for a few minutes would make it creamier.  This is so welcome to my diet, as I have pretty much eliminated sugar but still crave ice cream once in a while!!

I still haven’t used the ice cream maker either……

Winter time getaway


When winter sets in and day after day after day is nothing but gloomy gray skies, what’s a farmer to do?  Get away, of course!  Usually folks getaway to warmer places, but not this farmer–she ventured north to Niagara Falls!!!!

I have a friend who lives near there and I was wanting to get away from the farm for a few days so I watched the weather closely and voila!  There it was in the forecast–a long weekend without snow.  I loaded up the Subaru veggie wagon and off we went.

The drive up through West Virginia was beautiful and what made the drive manageable in one day was an audio book named “The Secret Life of Bees”.  AWESOME book!  I was at my friend’s house in 12 hours exactly, but it sure didn’t seem like that thanks to the book.

Did you know that Case Knives and Zippo Lighters are made by the same company?  I didn’t!  They have an awesome museum in Bradford, PA that I toured.

IMG_1552.JPG

You wouldn’t believe all the different Zippo lighters that have been made.  They have extensive collections of military, celebrities, rock stars, cartoon characters–you name it.  You can even design your own lighter at Zippo.com.  Heck, they’ll even repair your lighter for free!  A flag display had been created and I got my picture taken in front of it.  The tie-dye shirt almost blends in with all the lighters….

IMG_1554.JPG

Another interesting part of the trip was a visit to Heart’s Content Virgin Forest in the Allegheny National Forest.  The hemlock trees there were monstrous and lots of them were down due to a tornado that came through several years ago.  It was still interesting to see so many huge trees in one spot.

The most “touristy” trek on my trip was a visit to Niagara Falls.  Niagara has never been on my bucket list because I prefer attractions that aren’t so commercialized, but Niagara is pretty spectacular.  It was great that there weren’t a lot of people there and the weather was decent.

IMG_1255.JPGThis shot was taken from the other side of the falls (still on the American side).  The big green thing is the observation tower where you first walk into the park.  One of the most interesting things I saw were black squirrels running all over the park…..

IMG_1273.JPGThey were so cute!  And this fat squirrel who never moved a muscle the entire time we stood there taking pictures and gawking at him…


IMG_1262.JPGOne more interesting place we visited was Lynn Hall.  Ever heard of Fallingwater that was designed by Frank Lloyd Wright?  Well, the fellow that actually built Fallingwater is the person who built Lynn Hall.  It’s right outside Bradford and is currently under restoration by a couple who purchased it a few years back to save it from completely rotting away.  I didn’t get any photos of it, but they have a website called Lynn Hall Restoration Project that has the history of the house and a bunch of photographs.  It’s classic Frank Lloyd Wright design, but by a different designer.

The trip home was a little nervewracking, to start with anyway.  I was to leave Monday morning and looking at the weather forecast for the route home wasn’t pretty.  Major snow all up and down through Pa, Ohio, W Va, Ky, and Tn.  I opted to take the flat route through Ohio.  While watching the weather forecast I told myself if the snow is going to be hit-and-miss all the way home, I’ll just drive through the misses–and I did!  The Secret Life of Bees ended somewhere in Ohio, way to soon, and I had borrowed another book called “The Portrait of Dorian Gray” by Oscar Wilde but I COULD NOT get into that book, so I just jammed out to cd’s I had in the car. The worst road I hit was Hebbertsburg Road in Crab Orchard, Tennessee, and I was home!!!!

It was a fun break from boring winter and the monotonous chores of building beehive parts here on the farm; however, the chances of seeing that part of the country in February, without it being buried under several feet of snow, are very slim.

Wintertime “bee-ziness”

As the snow continues to fall outside, I work on frames.  Lots and lots of frames.  Surrounded by sweet-smelling beeswax, the monotony of winter subsides, if only for a while.

IMG_1287.JPG

I think of the upcoming season, of the great anticipation of a good bee year, and plan and scheme all the ways I’ve learned to increase the apiary.

Last season I spent a lot of time with my mentor and now great friend, learning as much as I can about bees.  Seems like the more one learns, the less one knows.  Bees are predictable in their biology and natural instincts, but very unpredictable as a hive.  Each hive has its own personality and mind of its own.  Our job as beekeepers is to entice them to stay in the hive, bee happy, stay healthy, and multiply.   If all these requirements are met, the bees will make enough honey to share.

So, as winter drags on, I glue, nail, and wire.  Once the temperature gets up a little warmer I’ll start building nucs and more hive boxes.  Plans are this year to split all 5 of the hives, add a new queen to each, and purchase 5 nucs so hopefully the apiary will grow to 15 hives.

That’s my story and I’m stickin’ to it!