Category Archives: bees

Wintertime “bee-ziness”

As the snow continues to fall outside, I work on frames.  Lots and lots of frames.  Surrounded by sweet-smelling beeswax, the monotony of winter subsides, if only for a while.

IMG_1287.JPG

I think of the upcoming season, of the great anticipation of a good bee year, and plan and scheme all the ways I’ve learned to increase the apiary.

Last season I spent a lot of time with my mentor and now great friend, learning as much as I can about bees.  Seems like the more one learns, the less one knows.  Bees are predictable in their biology and natural instincts, but very unpredictable as a hive.  Each hive has its own personality and mind of its own.  Our job as beekeepers is to entice them to stay in the hive, bee happy, stay healthy, and multiply.   If all these requirements are met, the bees will make enough honey to share.

So, as winter drags on, I glue, nail, and wire.  Once the temperature gets up a little warmer I’ll start building nucs and more hive boxes.  Plans are this year to split all 5 of the hives, add a new queen to each, and purchase 5 nucs so hopefully the apiary will grow to 15 hives.

That’s my story and I’m stickin’ to it!

Happy New Year!

How long can we keep saying that until it’s too late?  Well, we’re still in the single digits of the month of January, so I think it’s still appropriate!


IMG_1028.JPGNo, no, no, it’s not what you think!  I haven’t had any of this stuff (pga) since a homecoming game party I attended while going to UT back in the 70’s.  That hangover lasted for 2 days and I had deja vu while picking it up off the shelf in the liquor store the other day.

My beekeeping buddy gave me a container of propolis.  Now if you don’t know what propolis is, it’s bee glue.  Bees are scavengers of things they create for use in the hive; they collect nectar to make honey–we all know about that.  I’m not sure what they collect to make beeswax, but wax appears magically from glands on their bodies when they are a certain age.  They make bee bread for their babies which is made from pollen, and they make propolis, which is probably the most stickiest thing on earth, from resins from trees and plants.  They stop up holes in their hives to keep out unwanted pests, air, and water.  As beekeepers we’re keenly aware of propolis because we have to use a hive tool to pop open the top and each successive box is glued to the ones adjacent to it.  They glue frames in place, and will even propolize a mouse if it gets in the hive.  Too big to drag out, so they just encase it with propolis.  Pretty cool….

Propolis has great antibacterial properties and we humans use it for medicine.  Once it’s collected it is hard as a rock and unmanageable.  It also doesn’t dissolve in water—sooooo, Everclear to the rescue!  Propolis can also be dissolved in rubbing alcohol but it takes a lot longer to happen and cannot be used internally.

The propolis is in the plastic bag.  I froze it then took it out of the freezer and beat it with a hammer to smash it into small pieces so it would dissolve better.  The recipe I used is 1 part propolis to 5 parts alcohol.  It needs to sit for 2-3 weeks and be shaken occasionally.  This tincture can then be used as is for wounds or made into salves or balms to treat skin boo-boos.

Like I said, “Happy New Year”!


The Miss Bee-Haven meadow, elderberries, and seed starting in hot weather

One of the many, well millions, of projects on “the list” is to plant a bee meadow.  That would be a meadow for bees–a place that provides nectar, pollen, and a safe place to hang out.  I applied for a grant from USDA to convert one of the fields and a strip right through the middle of the apiary on the farm into pollinator habitat.

Didn’t get the grant.  That doesn’t mean the bees can’t have what they were asking for.  Using the 30×96 piece of plastic that came off the large high tunnel, I started smothering the weeds in the apiary itself.  I put it about 10 feet from the hive fronts and left it in place for about 3-4 weeks.  It did a great job of killing everything underneath.  Yesterday I moved the plastic over and started mulching the dead area with leaves.  I’d like to get the leaves on before it rains and before the seeds in there see daylight and start to come to life!

beemeadowplasticdownAs you can see in the photo, the beehives are along the left, the tan area is the dead plant material, and the plastic has been repositioned to smother another area 30×96.

My plans are to cover the entire area with a thick layer of leaves then run the mower over it to chop them up.  Hopefully by the time I’m ready to seed (late fall) there will be a little protective layer of composting leaves on top to help the seeds germinate.   So far, I’ve gotten a pound of a pollinator seed mix and other exuberant perennial seeds to plant here and there in the field as well.  Several pots of bee balm, rudbeckia, mints, obedient plant, and lemon mint are going to be actually planted around the field as well because they love to spread and multiply and that’s exactly what I’m looking for in the meadow.    Will keep you posted on the progress of this project.

Yesterday I took a bucket of leaves for mulching down to the elderberry patch. A few weeks ago I planted 65 elderberry bushes   beside the large high tunnel so I could attach netting to the side of the tunnel to cover the bushes when they get berries on them.  I want to make things with elderberries….jam, jelly, wine, syrup.  To collect them from the wild you’ve got to race with the birds to get the ripe berries.  I decided to just grow my own.  Last winter I ordered cuttings (sticks) and rooted them in soil then grew them on up to planting size.  Hopefully in a year or two there will be berries to pick.

elderberries8.14.15websize

While checking out the elderberries I spied a wonderful size patch of portulaca…….

portulacacloseup8.13.15

I couldn’t really tell what it was when I first pulled up to the bed, and I dragged a bag of leaves over there to mulch whatever it was that was taking over that spot in the garden.  Once I saw what it was, I weeded it, thanked it for being there, then continued to weed out all the different grasses that want to be in the same spot with the elderberries.

Portulaca is really good in a salad.  It adds a nice crunch AND it’s bursting with Omega 3 acids–yep, yet another “weed” that’s awesomely healthy.

Another project that I’ve been busy with the last few days has been getting the high tunnels planted for winter crops.  One of the hardest parts of my job is to get things started from seed, outside, this time of year.

Lettuce, spinach, kale, chard, arugula–all are synonymous with cool weather.  The weather is not cool right now.  The weather is miserable right now.  So what’s a farmer to do?  Try to fool Mother Nature-HA!  I did use the Old Farmer’s Almanac to plant on the best days for planting, tried to get the soil in as good a shape as I could, then I planted.  The seedbeds get watered twice a day if they need it and some of them have.  I noticed this evening that the spinach is beginning to germinate in the smaller high tunnel.  That’s always a relief!

smalltunnel8.13.15

One thing I’ve got to work on though–when I’m dragging the water hose through the center pathway it pushes leaves onto the seeds in the rows just adjacent to the center pathway–that’s not good!  I’m thinking something hanging from the ceiling to slip the hose through so it’s suspended in the air rather than dragging around on the ground.  Hey, another project for my list 🙂


I’m in a killing mood (trapping Yellow Hornets)

I often get in these moods when getting overrun in the garden by Mexican bean beetles, Japanese beetles, cabbage worms, harlequin cabbage bugs, or other creepy crawly invaders that NONE of the local insect population cares to eat.

A couple of days ago I began noticing those big yellow hornets flying around my back porch–my “woodworking shop” if you will.  I was very excited because I had just made a deal with a beekeeping buddy to purchase 4 nucs from him.  My goal is to get the apiary up to 10 hives this year and I’ve built up to 4 with the help of my beekeeping mentor, but the possibility of getting 4 more all at once is so exciting!

So, I went to the back porch/woodworking shop to fetch pieces and parts of hives to take over to his house and that’s when I saw them.  Too many hornets to just be fluttering around checking out the place, but actually coming and going from the access panel of my Hot Springs Spa.  Great 😦

Now here is what you DON’T do when you spot a bunch of hornets.  Go get the fly swatter.  Dumb idea.  Hornets can travel extremely fast when pissed and I have lots of hair.  One headed straight for my head and got caught in my hair right on top near the forehead.  I’m not sure how many times it stung me before I was able to get it untangled, but it felt like someone had hit me in the head with a hammer.  I treated it with a homeopathic remedy called Apis mellifera, an ice pack, a couple of Tylenol, and a splash of wine (lol).  I think the wine and ice worked better than the other stuff.

Last bee meeting we specifically covered how to make a yellow hornet trap because yellow hornets love to eat honey bees.  It seemed almost like the hornets were building up their population to be able to handle 8 hives.  So, I began gathering supplies for the trap–a 2 liter soda bottle….hmmmmm I haven’t had one of those around for years.  A cup of vinegar–oh great, there’s a cup left in the gallon just so I just used the vinegar jug instead.  A cup of sugar, and a banana peel.  I usually eat a banana in my yogurt every single morning but ran out of them about 3 days ago, wouldn’t you know it?

I don’t throw any plant material in the garbage, including things like banana peels that the chickens won’t eat.  I toss them out the back door into the yard.  So, I walked out into my aerial compost area and found the most recent banana peel.  Maybe it has enough stink left in it to do the job.

All these ingredients were shaken up, then I cut the top third of the jug off and turned it upside down and put it inside the bottom part to make a funnel so the hornets fall in but can’t fly back out.  I set it out and waited–30 minutes and they fly right by–1 hour, and nothing.

So I “became the hornet”–they like meat, so I got a piece of raw ground venison and threw that in the jug.  Hours passed and one tripped and fell into the jug, but it wasn’t a gratifying experience at all.

Another trap we discussed at the bee meeting was a light placed right over a pan of soapy water.  I took a stainless steel chafing pan and put about 2 inches of soapy water in it, and plugged the light in at dark.  This morning I was somewhat pleased but not overly excited–maybe 30 or 40 hornets had taking the sudsy plunge…..

I guess I’ll just have to have some patience to get them all–maybe I’ll get the bb gun out and practice, or the shotgun with bird shot…….

Bees, bee swarms, bee trees

Last Friday I got a text from my bee mentor that she was going to get a swarm for me–for me?  Wow!  I wanted to build my apiary up to 10 hives this summer–and she said she would help me do that!  She told me to bring over 2 complete hives and we’d put the swarm in them.

Uh…..oh my gosh!  I had to scurry around to put foundation in several frames because she said that swarms would build out wax foundation really quickly.   It’s always good to have “drawn comb” around when working with bees, so I wanted to use as new foundation much as possible.

After all the equipment was gathered, I headed to her house and we hived the swarm:

20150508_123354


20150508_123608

There were so many bees in the swarm she wanted to use 2 hives. When we dumped all the bees out of the swarm box, the majority of them seemed to be going in the hive on the left, but a couple of days later both hives seem equally populated and happy.

After the swarm was settled in the hives we took off to a “bee tree cutting” that one of our fellow beekeepers was handling.

IMG_0384

Neither one of us had ever witnessed a bee tree removal, but it was fascinating.  The tree was really dangerous to cut but he and his son cut the tree down, and after about 1/2 hours of searching, the queen was located, placed in the hive he brought to put the bees in, and we left the bees all filing into their new home.

IMG_0389

Then we went back to my bee buddy’s house and grafted 30 larvae into queen cups.  Man, that’s tedious work!  The things we do for bees……

It’s all about the Queen (honey bee, that is)

This is the third year of my adventures in beekeeping on the farm.  It has been challenging, to say the least!   Last year my bee buddy told me we were going to raise queens this year.  I said “we?”  You gotta mouse in your pocket?  She laughed and told me one of her bee buddies had set her up with a frame, tool, and one of those magnifying visors and he wants her to start raising queens, so she sucked me into the adventure.  Anything to learn about bees, I’m game.

She did all the prep work as far as putting nurse bees into a nuc the day before (queenless) with the brand new queen cups so they would clean the cups and get them ready for the larva to be inserted.

Now this isn’t going to mean much to folks who don’t know much about bees, but imagine taking a dental tool and removing a worm (that’s about 1/8 long) from a honeycomb cell and transferring it to another cell, placing it exactly in the center of the bottom AND making sure that you don’t injure it AND it has to be right side up.  Bee eggs are laid in a little puddle of royal jelly so they breathe through the top part of their bodies so they have to be placed right side up and they aren’t marked!

Difficult, to say the least.  My bee buddy wanted me to be “the eyes” of the operation (haha–she who has reading glasses laying in a trail behind her all over the place)

Anywho, we spent two days grafting eggs……

queengrafting4 queengrafting3
queengrafting1

Not two full days, just larva-transferring operations on two different days.

I eat and write with my left hand but sew, use scissors, and everything else with my right hand.  When confronted with a new task it takes me a few minutes to decide which hand to use.  She also had about 4 different kinds of grafting tools to try out.  I decided that I don’t do this well with either hand!

From the first batch of 23 cups we got 10 that the bees actually started working on.  The second batch of 30 we only got about 6 that the bees accepted.  THEN the nights got cold and the bees decided to cluster to keep warm rather than work on the queen cups.    She texted me and said we might get 5 out of both frames.

Oh well, we got some practice and will try again when the nights are above 50.  It’s an adventure!

If you are a bee-type person and want to see the YouTube video that inspired this operation, here it is:

The tree with a personality

There’s a big, gnarly tree right behind the house.   The big, gnarly tree is on the south side of the house at the bottom edge of the mountain behind the house.  When locating the spot to build the house I put the house site out away from the shadows of the mountain to get full sunshine into the south-facing windows all winter long.  It really helps heat the house when the sun is shining.  The gnarly tree bends way out into the yard past the shadow, but something about the tree enticed me to save it.

After the tree leafed out the next spring, I recognized the leaves on the tree as a Basswood or Linden, or Tilia americana from a place I lived before, about 20 miles across the county.  The first time I went to one of the beekeepers’ meetings in town I was talking to the then-President and he asked where I lived and I told him Crab Orchard.    He then said “Oooh, that should be a great place to keep bees because there are Basswood trees there”.

This tree and I have developed a relationship.  Since it hangs way out into the yard it has been a great place to hang bird feeders.  I’ve had to save it from being cut by persons who don’t understand our relationship (my boyfriend, to be exact) and explain that it isn’t a large inconvenience to drive around it when going through the back yard with the tractor.  It is so tempting to hang a rope swing from, but I’m afraid it might break the tree–looks very fragile to me.

The tree doesn’t bloom every year, but when it does, OH MY GOODNESS!  You  can smell the blooms from the front yard and hear the bees from the road–well, maybe not that far, but it is a busy place when in bloom.  The tree took a blooming break last year, so I’m hoping this year will be another spectacular season for bloom.

cropped-tiliablooms1.jpg

There’s a good blog written by a man who calls himself “Green Deane” and this week’s newsletter had an excellent article about this tree.  You can read it here:  http://www.eattheweeds.com/basswood-tree-linden-lime-tree/.    I didn’t realize the tree had so many uses AND is edible!  Hmmmm,  Linden  leaf salad for lunch 🙂

Several years ago a lady for whom I was doing landscaping maintenance made a trip to Europe.  She came back with a leaf and asked me to identify it.  I took the leaf home and studied it and I swore it looked like Tilia.  After researching a bit more I was sure that’s what it was so I took it back to her and asked her if it was called a Lime Tree and she smiled and said she thought that’s what it was.  She remembered the blooms from when she lived over there.

This past winter I thought the tree was a goner.  During the ice storm we had in February the tree was almost bent to the ground, and the bird feeder, which is usually about 8 feet off the ground, was laying on the ground.  Now it’s back to normal.  At some point in time I know the contorted and damaged trunk will no longer hold up the weight of the tree, but for now I enjoy its company and hopefully the bees will get to enjoy its blossoms this season.


How to deal with a laying worker bee

Geez, I didn’t realize beekeeping was going to be so challenging!  Starting out with 3 hives, and then down to 1 during the first summer–it overwintered year before last just fine, so I made 2 splits last spring and was back up to 3 hives.  I lost one during late winter this year and last week I looked in the hives and found the remaining split had a laying worker bee.  Workers, if they ever lay eggs at all, can only lay drones so the “brood nest” was full of drone cells.  A laying worker usually means no queen.

Dang!  I called my mentor and she said the best way to deal with a laying worker is to take the hive several yards away, like maybe 100 yards, and dump the bees all out of the hive.  The workers will fly back to the hive and the laying worker and her attendants will stay there.

It’s been raining or threatening rain every day since I talked to her and I didn’t want to dump the bees out in the rain, so I researched on the Internet and discovered that a worker bees ovaries are stimulated by a lack of brood, which is caused by a lack of a queen.  One of the ways to deal with a laying worker is to stack that hive on top of a queenright hive with two screens between them.  That way, the queenless hive is getting pheremones from the queenright hive so the worker MAY stop laying.  My intention is to dump the hive in the grass a few days after they’ve gotten a good dose of pheremones from the existing queen.

Moving that hive was a fiasco, for sure.  You talk about pissed bees!  These bees are not happy at all.  I got stung on the leg through my jeans and somehow a bee got into my jacket and I could feel it crawling up my neck–trying not to panic I started walk/running away from the hive, but there were lots of bees escorting me from the apiary.  Once I felt like the coast (outside my jacket) was clear, I stripped off the jacket and discovered the bee had gotten tangled up in my hair–next to my head!

Still trying not to panic, I removed the elastic braid from my hair and starting finger combing.  After about 3 minutes of shaking and flinging and hearing the bee buzz scarily close to my head,  (btw I have enough hair for 3 people) she was free, and so was I!

Here’s a picture of the hive after being stacked up skyscraper style:

stackedhives4-8-15

You can see the screened bottom board of the queenless hive in the middle of the stack with a screened spacer right under it.  I turned the entrance to the opposite side of the bottom hive.  Hope it works…… I’ll get some pics of the drone comb mess when I dump the girls out in the yard in a day or two.

Building beehives, part 74—-

Just kidding, well about the 74th part that is!  Seems like it should be part 231.

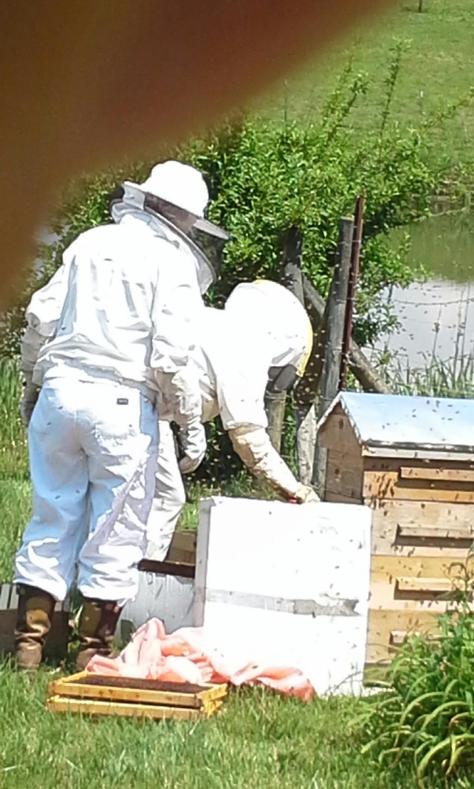
Seven hives, that’s all I wanted.  Whew!  I’m so good at biting off big chunks of things to accomplish.  Seven hives consists of 7 bottom boards, 35 boxes (5 for each hive), 7 inner covers, and 7 roofs.  Then I set up seven locations in the apiary to place the hives on.  It’s a lot of work, but I’m really excited about the possibility of expanding the “Miss Bee Haven” apiary this year.  My bee buddy and I are delving into the depths of queen rearing, but that will be another post another day.

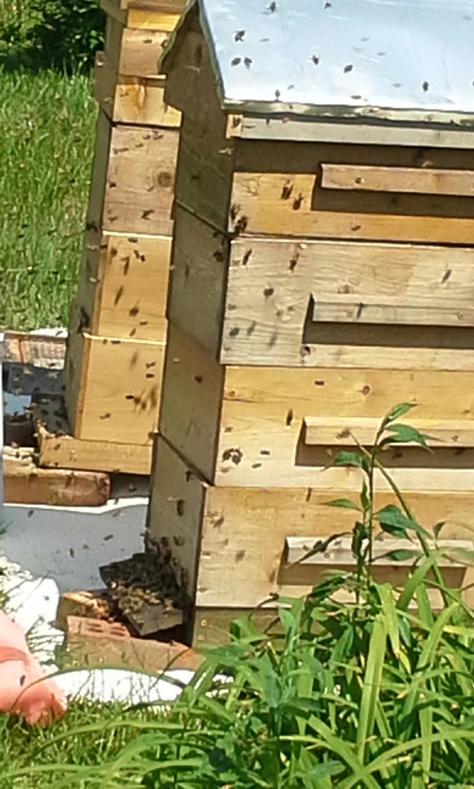
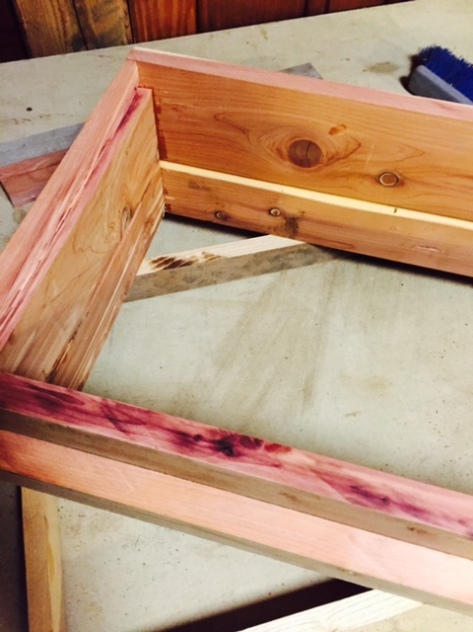
As I mentioned in an earlier post, a friend removed cedar boards from part of his house in order to add on a garage, and I was the lucky recipient of his discarded boards.  Although it has been more work to deal with removing/breaking off nails, working around broken places and damaged tongues and grooves, the project has gone rather smoothly.

First I tackled the boxes, since there were more of those than anything.  I glued two boards together to get the width I needed then cut them to size.  I used a strip of the waste for handles.

boxescomplete

As you can see, there is weathered color stain on some of the boards, but it’s all going to look like that eventually, so I’m not stressing over that.

Next step was the bottom boards:

bottomboard2015

I use two screens on my bottom boards.  The top screen is 1/2″ screen with a spacer then 1/8″ screen.  The theory behind this is that mites and hive debris fall through the 1/2″ screen and for the most part, the 1/8″ screen too.  However, the 1/8″ screen is small enough that mites can still cling to portions of it and bees are fastidious housekeepers so they do walk around on screened bottom boards cleaning up the mess.  They don’t really like to go under the 1/2″ screen, so they aren’t collecting bad things as readily as without the extra screen.

Inner covers are what goes on top of the boxes.  With these hives, I’m experimenting with top entrances, so I left off the front piece of the inner cover to allow for entrance.  I’ll just stuff something in there if the entrance needs to be reduced for some reason.  Carpet padding makes a great entrance reducer, as does the foil insulation I used on my house.

innercover2015

I do plan on drilling two holes in the inner covers to accommodate jar feeders that can be enclosed with another box and kept securely inside the hives.  When feeding jars are not in place, a piece of 1/8″ screen will keep the bees out of the roof area.  I glued 3 pieces of wood together to make the inner covers.

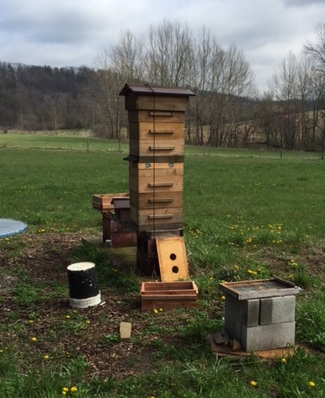
I’ve been saving the worst, uh best (jk) for last!  The roofs.  It would be so much easier to build the flat roofs that predominate the bee housing market, but I just had to do something more decorative.  The first 3 hives I built were sort of modeled from the Warre Hive and the roof was actually 3 parts, and a little complicated, and also heavy.  I Googled and searched till I found a simpler hive roof design (found it on HoneyBeeSuite).  I modified it to fit my box size and went with that.

As you can see in the photo, the end piece is a couple of boards glued together then simply cut out in the shape of the hive roof.  I allowed 1-3/4 inches to “telescope” over the sides of the hive.  A 1-1/2″ hole is drilled near the peak of the roof to allow for ventilation of the “attic” area.   A piece of screen is nailed over the hole from the inside to keep unwanted critters out.

nailingmetalonroof2015

Now for the top–the metal went on better than I thought it would.  (No gashes on the hands, but I did get one scratch) I was hoping to use brown metal rather than shiny but 24″ brown flashing is hard to find, and it’s cost prohibitive, and it’s thicker.  A local ACE Hardware store carries 24″ metal flashing, so that’s what I used.

All seven roofs were completed yesterday–yay!  Now I’ve just got to get a hole saw drill bit to drill the holes for the jars in the inner covers, get a roll of 1/2″ screen to finish the bottom boards, then add the hives to the apiary.

Then learn how to graft queens and add frames of brood, honey, pollen, etc. to make more hives….such a daunting task, but I’ll keep you posted!

Building Beehives

One person’s demolition project is another’s construction project.   A friend of mine added a garage to his house and in the process demolished part of the porch.  The porch ceiling and floor were both made from cedar boards.  They were headed to the burn pile but he offered them to me.  I saw beehives!

One of “the winter projects” is to build 7 beehives.  I’m wanting to expand the apiary and I think 10 is a good, reasonable number of hives for a novice beekeeper.  I’ve been waiting for warmer weather to continue working on the boxes, and every day I think it will be warm enough but today I decided to just do it although the high for the day was only 31 degrees.

My woodworking shop is on the back porch so I put on down-filled overalls and jacket and started up the table saw.

All the sawing was done outside, and the glueing and nailing done in the warmth of the house.

The boards are not wide enough to make a medium box (I use all medium 8-frame supers) so I’m gluing two of them together then trimming it to size.  The piece that is trimmed off the glued boards is then cut at an angle on one side to shed water and then glued and air-nailed over the seam–voila! a dual purpose handle and joint reinforcement.

The ends are notched to accommodate the frames and allow for “bee space”.   Corners are glued and nailed with finish  nails.

FullSizeRender (2)


The handles are ending up at different positions on each box but I don’t think that’s going to be a problem because every time I look at the them I’ll know they are in the “free” position!

Plans are to just let the hives weather.  Can’t wait to get back in the bees and the gardens!